Fisher
Has No Life - Lives on TB
Fair use
http://www.countrysidemag.com/issues/82/82-6/Deborah_Moore1.html
Learning to cook on a woodstove
By Deborah Moore
Big Bay, Michigan
When my companion and I began our 18-month transition period of moving to and living in the woods, we also began a period of education. We discussed and planned much. We bought books and magazines and took classes on everything from solar collecting to gardening.
One subject evaded me: cooking on a wood-burning stove. Every time I saw a magazine that flashed headlines on wood stoves, my hands would tremble in anticipation as I reached for it. However, the wood stoves in question were for heating, not for cooking.
Since we were looking at a self-sufficient lifestyle and wood on our 160 acres was virtually free, there wasn't even a consideration to use anything but wood for heating and cooking. Our land is approximately 95 percent maple, a steady source of excellent quality hardwood. Labor intensive yes, but since we were quitting our jobs, we had the time.
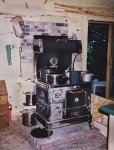
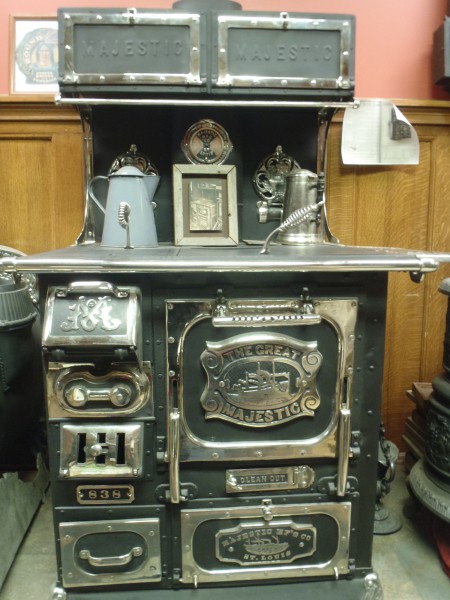
Initially, we tried to find a real antique stove for our kitchen. Since the 20' by 24' kitchen/dining/living room was to be the main focus of our new house, we wanted the stove not only to be functional but attractive as well. The antique stoves we found were either attractive but of questionable functionality, or functional and downright ugly.
We bit the bullet and bought a brand-new, old-fashioned looking Enterprise King from Lehman's (if you ever have the chance to visit there, do it!). To this day, I'm glad we spent the extra money. Not that there aren't good old stoves out there, but we never found one.
Our stove has a warming oven overhead, a tip-down butter warmer, a washable porcelain clad oven with thermostat and an optional water jacket. The firebox has a side lifter lid and easily takes a 20-inch log. And it looks good.
But I still didn't know how to cook on it.
Being an experienced cook (translation: I love to cook), I figured I was tough. I was smart! I was inventive! I was lost. So I learned the hard way, by trial and error, lots of practice and even more patience. I've burned a few things, but only because I wasn't paying attention.
The functioning of the stove is really quite simple. They will last for generations with proper care, since there is so little that can go wrong with them.
One end has a firebox, and outside the firebox are vents. Mine has four "dials" which regulate how much air is fed to the fire. The more you open the vents, the hotter the fire. The ash door can also be opened for a surge of air, but this needs to be watched very carefully.
There is a sliding mechanism towards the back of the firebox. This diverts the smoke coming from the fire to go around the oven box before it escapes up the chimney. This heats the oven more consistently. The position of the slide unit is most important before lighting the stove.
Because a draft needs to be created when first firing up, the slide needs to be directed to the chimney. The positioning for my stove is to the right to light, to the left to bake. If you forget to reposition the slide, the result will be a roomful of smoke.
You can't set it at 350 º and walk away! The biggest challenge is keeping the oven heat even. Unlike a gas or electric stove, when you put something in the oven to cook and the temperature drops as the food absorbs the heat, nothing kicks in to compensate. What to do? Feed the fire wood that will burn quickly and offer more heat.
As the food begins to cook and its internal temperature rises, a longer, slower-burning piece of wood will maintain the heat. Open the oven door if it gets too hot - but not for long. Your oven may even have "hot spots" like mine. During baking, I turn bread or cookies 180 degrees halfway through the baking time. Stay in the kitchen when there is cooking to be done. In winter, it's the best place to be.
Range top cooking is similar to a gas or electric stove, but you have more room available. The entire surface is hot, not just four little burners. No, those circles are not burners, as I once thought.
The surface area can be divided into three major temperature zones. The hottest is right over the firebox, whether it is on the right or left. The next warmest would be in the center, and the coolest is the front of the side opposite the firebox. After the coffee perks over the firebox, it stays warm sitting on the far right corner.
Everything needs to be watched carefully, as the heat can drop or flare in a very short time. Don't be discouraged. Once you get used to the heat always being there (it doesn't shut off with the twist of a knob), cooking on a wood stove is easy.
Grilling takes some patience, but it can be done. You can get pretty good results by removing one of those little circles over the firebox and placing a heat-resistant grate over the flame. I use half of a hamburger basket meant for grilling. I also lay aluminum foil around the opening to keep splatters to a minimum. Since most barbecuing is done inches above hot coals, some adjustment is necessary. I let flames do the grilling rather than coals. Since the grate is so much further from the heat, I use a hotter fire.
The cleaning and care you give your woodstove is important. Most cook stoves have three types of surfaces. There is cast iron, porcelain or enamel-finished sheet metal and decorative trim. A wet rag or sponge wiped daily on the decorative trim should suffice. For baked-on spots, a bit of non-abrasive cleanser like Soft-Scrub works very well. Prevention is the best approach to cleaning. Avoid spilling or splashing, since you can't wipe it up right away.
Don't put a wet pot on the stove. Remember, the surface is cast iron and will rust, even when hot. The least of your cleaning worries will be the rust ring, but the worst will be the ring underneath the rust that is there forever. Spots that are left on too long will pit the cast iron. By first taking a razor blade to spills, you can scrape up lots of gunk and save your buffing pad and shoulder.
Scotch Brite Very Fine is a metal sanding pad that is unsurpassed for cleaning even the toughest spots on cast iron surfaces. Always buff back and forth in one direction, from front to back, or you will get a scratched look. Always let the surface cool before buffing, or you will melt the cleaning pad.
Once the entire surface has been buffed, use a soft flannel cloth and wipe a thin layer of cooking oil over the whole surface. This seasons the top and makes it easier to clean the next day.
A word of caution: The oil has to be spread thinly. I've used too much, and when I lit the stove the next morning, the kitchen smelled like cooking popcorn.
When necessary, you will need to wipe down the metal back splash and warming oven. Warm, soapy water or a non-abrasive cleanser will do the trick. Clean the soot from under the oven monthly in the summer and weekly in the winter when the stove is constantly running. There is a small opening concealed by a decorative nameplate directly under the oven. Use a long-handled scraper to remove the blackish soot and hardened chunks. It's best to do this when the stove is cool, or the draft will keep pulling the soot back in. Don't forget the sides of the ash compartment. Cinders don't always fall into the ash pan.
One of the most overlooked areas for cleaning is the top of the oven box. Remember, you keep diverting smoke around the oven. If enough ash collects there, it will have an insulating effect, and your oven won't heat properly.
A friend and neighbor (around here, a neighbor is anyone who lives less than 10 miles away) complained that her recently purchased antique stove was giving her fits when she tried to maintain a steady temperature. I didn't hear another complaint after making this suggestion.
The cooking surface is made up of two to four panels of cast iron. Remove these panels when the stove is cold and set them on newspapers, as they are sooty. This exposes the top of the oven box. The first time I did this was after a year of cooking, and I had over two inches of ash. Carefully brush this ash into the firebox, where it can fall into the ash pan. Do this too quickly and you'll raise an ash cloud.
Then take your long-handled scraper and scrape the sides of the oven box. Soot will fall to the bottom, where it can be removed through that little hidden door. The whole process should take about 15 minutes, and it will make a world of difference in your oven temperature. This cleaning should be done monthly or bimonthly in the summer and weekly in the winter.
The gasket around the top of the stove should be carefully inspected every year and replaced if it is too worn. I never concerned myself with the gasket. Two and a half years later, there was no gasket left! My stove had lost its air tightness, and I hadn't even noticed.
Most gasket packages I've seen include 84 inches of material, but my stove requires 100 inches. There is no loss of efficiency when material is pieced together. Just scrape the old stuff off, lightly sand, wipe off, glue and install the new gasket. This takes only 15 minutes and a few dollars, but what a difference it makes. Now that we're thinking about Y2K, it would be wise to keep a few gaskets in storage. You never know if they'll be available in a few years.
Cast iron pots and pans are nice, but certainly not necessary for wood stove cooking. Ceramic casserole dishes are great. Use common sense with pots that have plastic or wooden handles. Don't put anything into the oven that wouldn't go into a conventional oven, and don't position handles over the cooking area that you couldn't expose to a gas burner. Never put a plastic bowl on the stove, even if you think it's cold.
I purchased two pieces of cast iron cookware for $5 at an estate sale last summer. They were valued at over $80 new in a catalog. The old pieces cleaned up quickly and are among my favorites. One major advantage of cast iron is that it stays hot. That might not seem like a big deal until you serve a pot of stew or spaghetti on a cool evening.
Use the warming oven to your advantage. I keep four plates (two meals) and two soup bowls in my warmer. Having a pre-warmed plate at mealtime can make a big difference. I also have a biscuit stone (a terra cotta disk that is heated and put in the bottom of a basket of biscuits or rolls) that I rarely remember to heat up on time, so I just leave it in the bottom of the oven.
What I cook since we moved to the woods has changed, but that's because we've changed the way we eat. We eat less meat and more home-grown vegetables, more soups and bread. I now have the time to bake, and homemade, fresh-baked bread tastes like heaven. Soup is easy to simmer on the stove.
We have very little waste, because everything goes into a soup jar. This is something every cook can do. If you open a can of mushrooms, pour the juice into a jar and freeze it. After you cook vegetables, pour that liquid into the jar. I even save the liquid from soaking the roasting pan. To prevent overeating, put the last few mouthfuls of veggies, rice or potatoes in the soup jar. It makes for some very interesting, economical, healthy and work-free soup. For me, it's a conscientious thing to do, as I care about not wasting things.
Here in the Upper Peninsula, the weather is fairly cold all the time, so the stove is always running except in mid-summer. The first thing I do in the morning is light the stove. While the kindling is catching, I feed Muffin, our 15-year old cat. Then I add three or four pieces of wood, light the kerosene lamp, check the temperature outside and add larger logs to the fire. Now it's time to put the coffee pot over the fire box. Then it's back to the warmth of the bed. It takes about 20 minutes for the water to boil and another 20 minutes to perk. By the time the coffee is ready, the room is also warm.
I bake something almost every day. Since our refrigeration (an antique ice box) is limited, I bake only one loaf of bread at a time. Cookies and biscotti are favorites around here. Dinner is usually started around 4 P.M., and I let the fire go out. The coals are ready to be knocked down into the ash pan by 9:00. Since I don't want to mess with all the details when it's cold in the morning, I lay a new fire, clear the stove top and fill the coffee pot at night. I'm ready for a new day.
http://www.countrysidemag.com/issues/82/82-6/Deborah_Moore1.html
Learning to cook on a woodstove
By Deborah Moore
Big Bay, Michigan
When my companion and I began our 18-month transition period of moving to and living in the woods, we also began a period of education. We discussed and planned much. We bought books and magazines and took classes on everything from solar collecting to gardening.
One subject evaded me: cooking on a wood-burning stove. Every time I saw a magazine that flashed headlines on wood stoves, my hands would tremble in anticipation as I reached for it. However, the wood stoves in question were for heating, not for cooking.
Since we were looking at a self-sufficient lifestyle and wood on our 160 acres was virtually free, there wasn't even a consideration to use anything but wood for heating and cooking. Our land is approximately 95 percent maple, a steady source of excellent quality hardwood. Labor intensive yes, but since we were quitting our jobs, we had the time.
Initially, we tried to find a real antique stove for our kitchen. Since the 20' by 24' kitchen/dining/living room was to be the main focus of our new house, we wanted the stove not only to be functional but attractive as well. The antique stoves we found were either attractive but of questionable functionality, or functional and downright ugly.
We bit the bullet and bought a brand-new, old-fashioned looking Enterprise King from Lehman's (if you ever have the chance to visit there, do it!). To this day, I'm glad we spent the extra money. Not that there aren't good old stoves out there, but we never found one.
Our stove has a warming oven overhead, a tip-down butter warmer, a washable porcelain clad oven with thermostat and an optional water jacket. The firebox has a side lifter lid and easily takes a 20-inch log. And it looks good.
But I still didn't know how to cook on it.
Being an experienced cook (translation: I love to cook), I figured I was tough. I was smart! I was inventive! I was lost. So I learned the hard way, by trial and error, lots of practice and even more patience. I've burned a few things, but only because I wasn't paying attention.
The functioning of the stove is really quite simple. They will last for generations with proper care, since there is so little that can go wrong with them.
One end has a firebox, and outside the firebox are vents. Mine has four "dials" which regulate how much air is fed to the fire. The more you open the vents, the hotter the fire. The ash door can also be opened for a surge of air, but this needs to be watched very carefully.
There is a sliding mechanism towards the back of the firebox. This diverts the smoke coming from the fire to go around the oven box before it escapes up the chimney. This heats the oven more consistently. The position of the slide unit is most important before lighting the stove.
Because a draft needs to be created when first firing up, the slide needs to be directed to the chimney. The positioning for my stove is to the right to light, to the left to bake. If you forget to reposition the slide, the result will be a roomful of smoke.
You can't set it at 350 º and walk away! The biggest challenge is keeping the oven heat even. Unlike a gas or electric stove, when you put something in the oven to cook and the temperature drops as the food absorbs the heat, nothing kicks in to compensate. What to do? Feed the fire wood that will burn quickly and offer more heat.
As the food begins to cook and its internal temperature rises, a longer, slower-burning piece of wood will maintain the heat. Open the oven door if it gets too hot - but not for long. Your oven may even have "hot spots" like mine. During baking, I turn bread or cookies 180 degrees halfway through the baking time. Stay in the kitchen when there is cooking to be done. In winter, it's the best place to be.
Range top cooking is similar to a gas or electric stove, but you have more room available. The entire surface is hot, not just four little burners. No, those circles are not burners, as I once thought.
The surface area can be divided into three major temperature zones. The hottest is right over the firebox, whether it is on the right or left. The next warmest would be in the center, and the coolest is the front of the side opposite the firebox. After the coffee perks over the firebox, it stays warm sitting on the far right corner.
Everything needs to be watched carefully, as the heat can drop or flare in a very short time. Don't be discouraged. Once you get used to the heat always being there (it doesn't shut off with the twist of a knob), cooking on a wood stove is easy.
Grilling takes some patience, but it can be done. You can get pretty good results by removing one of those little circles over the firebox and placing a heat-resistant grate over the flame. I use half of a hamburger basket meant for grilling. I also lay aluminum foil around the opening to keep splatters to a minimum. Since most barbecuing is done inches above hot coals, some adjustment is necessary. I let flames do the grilling rather than coals. Since the grate is so much further from the heat, I use a hotter fire.
The cleaning and care you give your woodstove is important. Most cook stoves have three types of surfaces. There is cast iron, porcelain or enamel-finished sheet metal and decorative trim. A wet rag or sponge wiped daily on the decorative trim should suffice. For baked-on spots, a bit of non-abrasive cleanser like Soft-Scrub works very well. Prevention is the best approach to cleaning. Avoid spilling or splashing, since you can't wipe it up right away.
Don't put a wet pot on the stove. Remember, the surface is cast iron and will rust, even when hot. The least of your cleaning worries will be the rust ring, but the worst will be the ring underneath the rust that is there forever. Spots that are left on too long will pit the cast iron. By first taking a razor blade to spills, you can scrape up lots of gunk and save your buffing pad and shoulder.
Scotch Brite Very Fine is a metal sanding pad that is unsurpassed for cleaning even the toughest spots on cast iron surfaces. Always buff back and forth in one direction, from front to back, or you will get a scratched look. Always let the surface cool before buffing, or you will melt the cleaning pad.
Once the entire surface has been buffed, use a soft flannel cloth and wipe a thin layer of cooking oil over the whole surface. This seasons the top and makes it easier to clean the next day.
A word of caution: The oil has to be spread thinly. I've used too much, and when I lit the stove the next morning, the kitchen smelled like cooking popcorn.
When necessary, you will need to wipe down the metal back splash and warming oven. Warm, soapy water or a non-abrasive cleanser will do the trick. Clean the soot from under the oven monthly in the summer and weekly in the winter when the stove is constantly running. There is a small opening concealed by a decorative nameplate directly under the oven. Use a long-handled scraper to remove the blackish soot and hardened chunks. It's best to do this when the stove is cool, or the draft will keep pulling the soot back in. Don't forget the sides of the ash compartment. Cinders don't always fall into the ash pan.
One of the most overlooked areas for cleaning is the top of the oven box. Remember, you keep diverting smoke around the oven. If enough ash collects there, it will have an insulating effect, and your oven won't heat properly.
A friend and neighbor (around here, a neighbor is anyone who lives less than 10 miles away) complained that her recently purchased antique stove was giving her fits when she tried to maintain a steady temperature. I didn't hear another complaint after making this suggestion.
The cooking surface is made up of two to four panels of cast iron. Remove these panels when the stove is cold and set them on newspapers, as they are sooty. This exposes the top of the oven box. The first time I did this was after a year of cooking, and I had over two inches of ash. Carefully brush this ash into the firebox, where it can fall into the ash pan. Do this too quickly and you'll raise an ash cloud.
Then take your long-handled scraper and scrape the sides of the oven box. Soot will fall to the bottom, where it can be removed through that little hidden door. The whole process should take about 15 minutes, and it will make a world of difference in your oven temperature. This cleaning should be done monthly or bimonthly in the summer and weekly in the winter.
The gasket around the top of the stove should be carefully inspected every year and replaced if it is too worn. I never concerned myself with the gasket. Two and a half years later, there was no gasket left! My stove had lost its air tightness, and I hadn't even noticed.
Most gasket packages I've seen include 84 inches of material, but my stove requires 100 inches. There is no loss of efficiency when material is pieced together. Just scrape the old stuff off, lightly sand, wipe off, glue and install the new gasket. This takes only 15 minutes and a few dollars, but what a difference it makes. Now that we're thinking about Y2K, it would be wise to keep a few gaskets in storage. You never know if they'll be available in a few years.
Cast iron pots and pans are nice, but certainly not necessary for wood stove cooking. Ceramic casserole dishes are great. Use common sense with pots that have plastic or wooden handles. Don't put anything into the oven that wouldn't go into a conventional oven, and don't position handles over the cooking area that you couldn't expose to a gas burner. Never put a plastic bowl on the stove, even if you think it's cold.
I purchased two pieces of cast iron cookware for $5 at an estate sale last summer. They were valued at over $80 new in a catalog. The old pieces cleaned up quickly and are among my favorites. One major advantage of cast iron is that it stays hot. That might not seem like a big deal until you serve a pot of stew or spaghetti on a cool evening.
Use the warming oven to your advantage. I keep four plates (two meals) and two soup bowls in my warmer. Having a pre-warmed plate at mealtime can make a big difference. I also have a biscuit stone (a terra cotta disk that is heated and put in the bottom of a basket of biscuits or rolls) that I rarely remember to heat up on time, so I just leave it in the bottom of the oven.
What I cook since we moved to the woods has changed, but that's because we've changed the way we eat. We eat less meat and more home-grown vegetables, more soups and bread. I now have the time to bake, and homemade, fresh-baked bread tastes like heaven. Soup is easy to simmer on the stove.
We have very little waste, because everything goes into a soup jar. This is something every cook can do. If you open a can of mushrooms, pour the juice into a jar and freeze it. After you cook vegetables, pour that liquid into the jar. I even save the liquid from soaking the roasting pan. To prevent overeating, put the last few mouthfuls of veggies, rice or potatoes in the soup jar. It makes for some very interesting, economical, healthy and work-free soup. For me, it's a conscientious thing to do, as I care about not wasting things.
Here in the Upper Peninsula, the weather is fairly cold all the time, so the stove is always running except in mid-summer. The first thing I do in the morning is light the stove. While the kindling is catching, I feed Muffin, our 15-year old cat. Then I add three or four pieces of wood, light the kerosene lamp, check the temperature outside and add larger logs to the fire. Now it's time to put the coffee pot over the fire box. Then it's back to the warmth of the bed. It takes about 20 minutes for the water to boil and another 20 minutes to perk. By the time the coffee is ready, the room is also warm.
I bake something almost every day. Since our refrigeration (an antique ice box) is limited, I bake only one loaf of bread at a time. Cookies and biscotti are favorites around here. Dinner is usually started around 4 P.M., and I let the fire go out. The coals are ready to be knocked down into the ash pan by 9:00. Since I don't want to mess with all the details when it's cold in the morning, I lay a new fire, clear the stove top and fill the coffee pot at night. I'm ready for a new day.